Spring of 2010 was a blur - our daughter graduated college, moved twice, and then married her high school sweetheart. Post-wedding exhaustion kind of took over and we laid around the house in a "what just happened?" kind of stupor for a couple of weeks. I coordinated another wedding for a friend and we took a weekend getaway to celebrate our 30th anniversary. Then....
NOTHING.
I was driving by a Home Depot on my way home from work one day and on an impulse pulled in. I was looking around at all the new cabinets and how much it cost even for new fronts and on a sort of whim decided I should try to re-front ours. The only drawback was I had little to no experience with power tools, but I convinced myself I could do it. I operate some pretty sophisticated equipment for a living....why couldn't I learn to use a power saw?? Have I mentioned how much some of the women who write the blogs on the right-hand side of my page inspire me?
I decided to do one side of the kitchen at a time. I started by taking the cabinet doors off, measuring and cutting beadboard to fit. Beadboard was attached to the front of the cabinet doors with liquid nails and left overnight to dry. Then I cut lattice trim to frame out the front of the door. This was also attached with liquid nails - love that stuff! Sorry in advance for the quality of the pictures - these were taken long before I thought about putting them on a blog and most are iPhone pics.
Attaching beadboard to the front of the door:
This is when the prime and paint fest took over. The new doors, cabinets, and bases were all primed with 2 coats of KILZ and then painted glossy white with 2 coats of Behr Premium Plus latex in Ultra Pure White. I really worried about using a latex rather than an oil based paint, but it's been almost 6 months and so far so good! I found our cabinet hardware and new doorknob for the pantry on ebay.
Who needs "paint pyramids" when you have Great Value corn?
Doors back on!
Some of the hardware on:
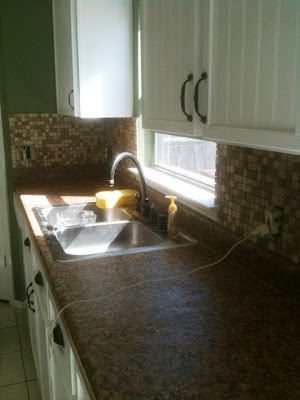
Countertops were next. We really tossed this around...I know granite is a great investment, but we were determined to do this project on a tight budget. Plus we found discontinued, although brand new countertops at the Habitat for Humanity Restore! Have I mentioned how much I love that place?? Hubby helped me out with the countertops. A LOT.
How do you weigh down countertops? With scuba tanks, of course.
My brother in law had this faucet that needed a new home:
This is where I went into a full-blown stall. I don't know why, but I had a terrible mental block about tiling the blacksplash. I put it off for weeks. Finally, I got up one morning and decided that was the day and I would just get it overwith. I used the 12x12 sheets of tumbled travertine which we found at a local building surplus store. Afterwards, I couldn't believe I had waited so long! Easiest part of the whole project by far. On the wall one day and grouted the next.
Before the grout:
After:
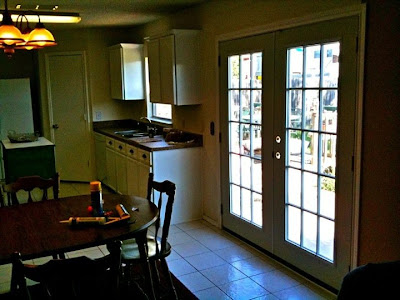
We also replaced our builder grade sliding glass door with french doors. This is the one thing we didn't do ourselves. Luckily I have a cousin who owns a construction company and he was able to do it for us. I love how much light we get in here now. I don't even think I'm going to put any sort of treament on them.
No doorknob yet haha:
Somewhere in the middle of everything, I found a solid oak pedestal table for $60 on Craigslist that we bought and painted black. I just painted the chairs from our existing table to match. We painted the walls green and added crown moulding. We also added beadboard to the wall in the breakfast area to tie in with the new cabinet fronts. I cut down the curtain rod that was over the sliding glass door, painted it and used it to hang a burlap no-sew treatment over the kitchen window.
Beadboard wall:
Crown Moulding:
Window treatment:
I thought I was done, but one day Melissa posted this. New appliances weren't originally in the plan, but it was a great deal and we had saved quite a bit of money on the rest of the remodel so we did it.
Our 1990's kitchen before:
And after:
I'm linking up to the Before and After party at Thrifty Decor Chick and Transformation Thursdays at The Shabby Chic Cottage. Be sure and spend some time checking out all the other great projects!


It looks great! We're trying to decide what to do with our kitchen (on a tiny budget!) and I'm going to bookmark your post and show it to my hubby.
ReplyDeleteOur kitchen is painted a green similar to yours and I want to paint the cabinets white. Thanks for sharing with us!
Aren't you so proud of how this came out. Just beautiful and you took it one step at a time. Each time you are encouraged to go forward another step. I think you did a fabulous job. Hop over to my blog sometime for my giveaway.
ReplyDeleteWow, I would LOVE to do that to my cabinets!! How did you get that "rim" around the edges of your cabinet doors?
ReplyDeleteI love your kitchen remodel and I can't believe you did those cabinets yourself!!! You go girl!
ReplyDeleteI can't remember how I found your blog but I'm your newest follower. Looking forward to seeing what you do next!
I love it when you can make changes on your own! There is so much satisfaction when you stand back and see what YOU have created! I love the hardware on the white cabinets and the backspash so updates everything! Beautiful work.
ReplyDelete-Angela
Thank you all so much! I wish I had taken more pictures of the "how-to" part, but I was trying to figure it out as I went along. Erin, we are about to do the same process for cabinets in our laundry room and I will post a tutorial with detailed pictures of how to cover the cabinet door fronts. Again, thanks so much for your sweet comments...they are very encouraging!
ReplyDelete