Sunday, February 20, 2011

Quick and Easy Project

I love doing projects with things I already have around the house!


I found this little wooden crate at a thrift store several years ago (yep -$2.92 lol). It sat on our kitchen counter with plates in it for years.  When we did our kitchen remodel, I put it away and kind of forgot about it.  The weather was so pretty this weekend,  I guess I got in the mood for spring cleaning and while I was taking some things up to the attic I found it again and decided to do something else with it.


We have lots of family get-togethers at our house and I always serve the meal buffet style.  I never know what to do with the cutlery...sometimes I set the table and just put the plates on the buffet, but that's not always practical.  I've looked for something cute to put the cutlery in and I've found lots of pretty little baskets, but most of them seemed more appropriate for an outdoor type meal.

I saw this on someone else's blog (I can't take credit for the idea) and when I saw this little crate again, thought it would be perfect and I already had everything I needed on hand!

First, I gave it a couple of coats of ivory paint.


After the paint was dry, I sanded around the edges and a little on the front to distress it and rubbed some dark brown glaze over it.


My litte Nerdy Bird had given me an antique pendant several years ago that I took off the chain and attached to the front with some E-6000 adhesive.


I'm going to be on the lookout for some mason jars to use in it, but for now, I just used some jars I already had.  I think there is even enough room in the back to add plates.


If the person who had this on their blog happens to see this, please let me know so I can give you credit!  I started a folder of inspiration pics a long time ago before I ever thought about blogging and didn't note where I saw it. 


Now I need to think of an excuse to use it!


We have several projects going at once this weekend - this was a quick one while I was waiting on paint to dry on another one ha!  I've had several people ask for a tutorial on the cabinet fronts - we are doing the same thing in our laundry room so I will have it up soon!

Have a great week!


Monday, February 7, 2011

Our Kitchen Remodel


We started working on our kitchen remodel the first week of August.  Everything was still builder grade and had served us pretty well, but was just outdated and ready for a change. I had swooned over all the before and after pics in blogland.   I became a stalker secret admirer of Sarah and Melissa. We had discussed it for months, made many a trip to Home Depot and dreamed about what we might do, but we were busy planning this:

Spring of 2010 was a blur - our daughter graduated college, moved twice, and then married her high school sweetheart.   Post-wedding exhaustion kind of took over and we laid around the house in a "what just happened?" kind of stupor for a couple of weeks.  I coordinated another wedding for a friend and we took a weekend getaway to celebrate our 30th anniversary.  Then....

NOTHING.

I was driving by a Home Depot on my way home from work one day and on an impulse pulled in.  I was looking around at all the new cabinets and how much it cost even for new fronts and on a sort of whim decided I should try to re-front ours.  The only drawback was I had little to no experience with power tools, but I convinced myself I could do it.  I operate some pretty sophisticated equipment for a living....why couldn't I learn to use a power saw??  Have I mentioned how much some of the women who write the blogs on the right-hand side of my page inspire me? 

I decided to do one side of the kitchen at a time.  I started by taking the cabinet doors off, measuring and cutting beadboard to fit.  Beadboard was attached to the front of the cabinet doors with liquid nails and left overnight to dry.  Then I cut lattice trim to frame out the front of the door.  This was also attached with liquid nails - love that stuff!  Sorry in advance for the quality of the pictures - these were taken long before I thought about putting them on a blog and most are iPhone pics.


Attaching beadboard to the front of the door:


This is when the prime and paint fest took over.  The new doors, cabinets, and bases were all primed with 2 coats of KILZ and then painted glossy white with 2 coats of Behr Premium Plus latex in Ultra Pure White.  I really worried about using a latex rather than an oil based paint, but it's been almost 6 months and so far so good!  I found our cabinet hardware and new doorknob for the pantry on ebay.


Who needs "paint pyramids" when you have Great Value corn?

Doors back on!

Some of the hardware on:


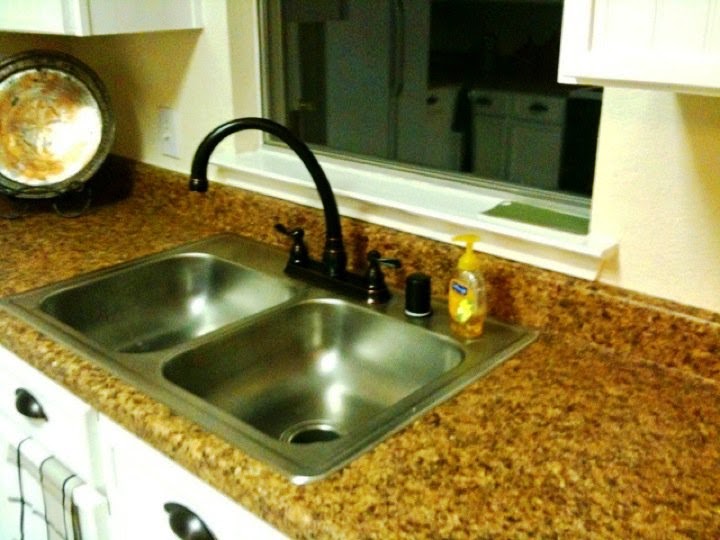
Countertops were next.  We really tossed this around...I know granite is a great investment, but we were determined to do this project on a tight budget.  Plus we found discontinued, although brand new countertops at the Habitat for Humanity Restore!  Have I mentioned how much I love that place??  Hubby helped me out with the countertops.   A LOT.

How do you weigh down countertops?  With scuba tanks, of course.


My brother in law had this faucet that needed a new home:


This is where I went into a full-blown stall.  I don't know why, but I had a terrible mental block about tiling the blacksplash.  I put it off for weeks.  Finally, I got up one morning and decided that was the day and I would just get it overwith.  I used the 12x12 sheets of tumbled travertine which we found at a local building surplus store.  Afterwards, I couldn't believe I had waited so long!  Easiest part of the whole project by far.  On the wall one day and grouted the next.


Before the grout:

After:


We also replaced our builder grade sliding glass door with french doors.  This is the one thing we didn't do ourselves.  Luckily I have a cousin who owns a construction company and he was able to do it for us.  I love how much light we get in here now.  I don't even think I'm going to put any sort of treament on them.

No doorknob yet haha:


Somewhere in the middle of everything, I found a solid oak pedestal table for $60 on Craigslist that we bought and painted black.  I just painted the chairs from our existing table to match.  We painted the walls green and added crown moulding.  We also added beadboard to the wall in the breakfast area to tie in with the new cabinet fronts. I cut down the curtain rod that was over the sliding glass door, painted it and used it to hang a burlap no-sew treatment over the kitchen window.

Beadboard wall:

Crown Moulding:

Window treatment:


I thought I was done, but one day Melissa posted this.  New appliances weren't originally in the plan, but it was a great deal and we had saved quite a bit of money on the rest of the remodel so we did it.


Our 1990's kitchen before:


And after:


We have really enjoyed our new kitchen and are slowly making our way through the rest of the house!  Thanks for stopping by!

I'm linking up to the Before and After party at Thrifty Decor Chick and Transformation Thursdays at The Shabby Chic Cottage. Be sure and spend some time checking out all the other great projects!


Sunday, February 6, 2011

Valentine Cake Balls (on a stiiiiick)

Those of you who know me well know that I DO NOT COOK.  At least not for pleasure or creative purposes anyway.  I do not own all kinds of kitchen appliances.  The Food Network may as well be a foreign language and I don't know (or even care) what most of The Pampered Chef gadgets are for.  I never read recipes that call for more than 3-4 ingredients.  I'm not exaggerating.

Every great once in a while, the stars will misalign or something and I will try something new in the kitchen that involves cooking.  Last year my sister and best friend we made chocolate covered apples for the favors for our daughter's wedding.  I was looking online for the sticks to put in them and I stumbled upon Bakerella's website.  She has some of the cutest ideas and she actually makes it look fun and simple.  Weird, but I was dying to try her cake pops so I called my sister  - who is The Pampered Chef and Betty Crocker all rolled into one.  The Food Network is on at her house on some sort of continuous feedback loop or something and she actually cooks for fun.  I don't get it, but I knew there was no way I was going to attempt anything like that without her there.  We tried them and actually had a grand 'ol time. 

Well, I guess lightning can indeed strike twice in the same place because for some reason, I thought it would be a good idea again.  We actually learned a few things from the first time and decided to make Valentine cake pops.  Now believe me, people....if I can do it, YOU can!  This would even be a lot of fun to do with your kids or grandkids.

Bakerella has a whole book dedicated to cake pops, but she has the basic recipe on her website.  Just make your cake a day or two ahead of time, cut up into small squares and refrigerate until your ready to go. Since we were making Valentine pops, we used red velvet cake mix.  Dump the cake squares into a bowl and mix in about 3/4 can of ready-made (is there any other kind?) cream cheese frosting. 


Mix it all together until you get a play-dough like consistency.  It's easiest to just use your hands - and yes - it gets very messy!


Roll into balls and place on wax paper.  Melt a little of your almond bark, dip one end of a lollipop stick in it and place the stick about halfway down into the cake ball.  Something we learned from last time is the cake balls will stay on the stick a lot better during dipping if you let them freeze solid.  Once you get the sticks into them, pop them into the freezer and this might be good time to go steal decorating ideas from look at model homes.  Just a suggestion.


After a couple of hours, we melted the almond bark in the microwave, thinned it out a little with some Crisco and dipped away.  We used white almond bark, tinted some white bark pink, and we used chocolate bark.  Then just go crazy with the sprinkles.  We had some foam blocks handy to stand them in and let them dry until they were ready to be bagged. 


We bagged them and tied them with some pretty ribbon and made a centerpiece for sis's Bunco group she's hosting Friday and I made a centerpiece to take to work this week.  


We had about 50 pops left over so we just poked them down into some red lace-covered styrofoam.  Wouldn't these be cute in pastel colors for Easter or a baby shower?

  
Even though I had a lot of fun making them and spending time with Sis, I don't think it will inspire me on to be a better cook.  I am a klutz in the kitchen and at one point had a big blob of Crisco hanging from my eyelashes.  Cooking is dangerous.  I'll stick to the power tools.
 

Tuesday, February 1, 2011

Saturday Spray Paint-a-Thon

Last weekend's weather was so beautiful I couldn't stand to stay inside!  I gathered some of the decor in my house as well as some that has been hibernating in the garage to give them a little makeover.

A few of the victims candidates:


I already had about 4 cans of my favorite Oil Rubbed Bronze spray paint:


When we remodeled the den this past fall, we mounted a flat screen TV above the mantel.  That was a difficult decision because I love to decorate the mantel for the different seasons.  But it really seemed to work with the floorplan and although I don't regret it (don't worry honey, I'm not going to ask to move it), it's a decorating challenge to make a pretty mantel.  I've been looking for something with a low profile and we found this little beauty for $3 on one of our Habitat  Restore trips:


It's an old brass light fixture that I'm trying to figure out where it would have been used...the bulbs would have to have been tiny.  Anyhoo...I took it apart and gave it a good coat of ORB, remounted the globes (?) and put white votives in them. 

So now we have this:


 We also found this.  It had no price tag, so the lady sold it to us for $1:


I think it was a porchlight or maybe a hall light?  I don't know, but she had pretty beveled glass lenses and just needed a little surgery makeover:


Now she's on one side of the mantel:


She's helping me balance out the Shanty Sisters Apothecary Jars on the other end. This is one of the most fun projects I've done. 

Check out Ashley and Whitney's other creations and see the jar tutorial here


We also had some of these lurking around the garage:


They weren't able to escape the spray paint frenzy either.  I'm not finished with them yet, but I love these Pottery Barn lanterns.

This is the direction I'm going (sorry so pixely):


Several other things received a fresh coat of paint as well, but I'm saving those for other projects...wouldn't make much sense if I posted them now!

Hope you were able to spend some time outside doing what you love!


I'm linking up with Remodelaholics Anonymous Party. Click on the button below to see some great projects!